

Made with glutinous rice flour, mochi cake is a popular Asian dessert with a crunchy outside, a soft and chewy inside. I started making (plain) mochi cake about 12 years ago with a recipe from my mom. In 2014, I discovered the Matcha Mochi Cake recipe by Jennifer Che of Tiny Urban Kitchen; which won my heart. It remains one of my favorite desserts to bake.
Ingredients
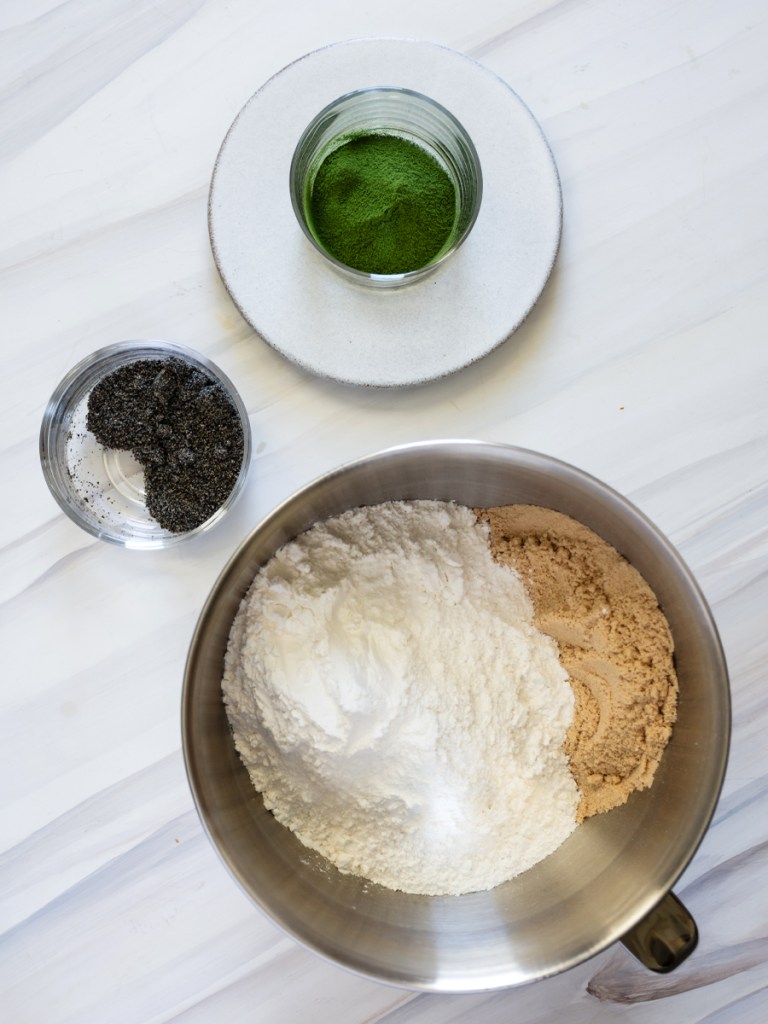
- 454 g (16 oz) glutinous rice flour, 1 package
- 20 g (10 tsp) culinary matcha, sifted
- 200 g (1 cup) maple sugar or 150 g (¾ cup) cane sugar
- A pinch of sea salt
- 65 g (⅓ cup) safflower oil
- 478.5 g (2 cups) oat milk or whole milk
- 3 eggs, beaten
- nonstick baking spray with flour or shortening —10 g (2 tsp) for loaf pans; 15 g (3 tsp) for bundt pans plus 4 g (2 tsp) rice flour for dusting

Equipment
- Loaf pans (2) or mini bundt cake pans (2)
- Hand mixer, with beater attachment or stand mixer, with paddle attachment
- Large mixing bowl
- Small bowl
- Spatula
- Sifter
- Fork
- Toothpick
- Food scale
- Pastry brush
- Pastry scraper, plastic or silicone
This recipe can be baked with either loaf pans, or mini bundt pans. The easier (and original) version is using the loaf pans, but these will require a longer baking time. See Notes section for more information on other baking pans options.
Directions
Combine dry ingredients (glutinous rice flour, matcha, sugar, and salt) in the bowl of a stand mixer, or a large mixing bowl, and stir together.
Add wet ingredients (vegetable oil, milk, and eggs) to dry ingredients.
Set a running timer, stir all ingredients on low speed for 1 – 2 minutes. Stop the mixer and scrape the edges and bottom of the bowl with a spatula; increase speed to medium and continue mixing. Repeat (mix and scrape) for 12 minutes total, or until the batter is velvety smooth.


Before baking, let batter rest in the bowl for 20 minutes, uncovered at room temperature. In the meantime, move the rack to the middle of oven, set temperature for preheat, and grease the pans according to the section below.
The Batter
Loaf Pans

| Dimensions L x W x H | 10 in x 4.4 in x 2.8 in (25.4 cm x 11.18 cm x 7.11 cm) |
| Oven Temperature | 350°F (180°C) |
| Baking Time | 50 – 60 minutes |
| Batter Amount | 665 g per pan; divide evenly—batter height should be ~ 1.25 in (3.18 cm). Use a food scale to help with this step. |
| Grease Amount | nonstick baking spray or 10 g (2 tsp) shortening (see Notes section for substitute); safflower oil will also work. Divide amount between both loaf pans, and use a pastry brush to coat throughly (especially the corners). |
Mini Bundt Pans

| Dimensions L x W x H | 14.88 in x 8.88 in x 1.75 in (37.80 cm x 22.56 cm x 4.45 cm) |
| Oven Temperature | 375°F (190°C) |
| Baking Time | 23 – 28 minutes |
| Batter Amount | 665 g per pan; fill mold to 0.375 in (9.5 mm) below the rim, at ~ 75% capacity |
| Grease Amount | nonstick baking spray or 15 g (3 tsp) shortening (see Notes section for substitute). Divide amount between two pans, use a paper towel to apply, then pastry brush to distribute throughly, then use 4 g (2 tsp) rice flour (i.e. Mochiko) to dust both bundt pans. |
Tap pans on the counter to remove air bubbles in the batter; which will result in a smoother texture in the finished cake.
Bake until the crust is slightly golden; baking time may vary depending on type of pan, oven, and flavor ingredients (see Notes section for more on this).


Check the cake a few minutes before the timer, by inserting a toothpick into the thickest part of the cake. If the toothpick is clean, then the cake is done. If the batter sticks to the toothpick, bake for an additional 2 – 5 minutes.
Cake Removal
Loaf Pans


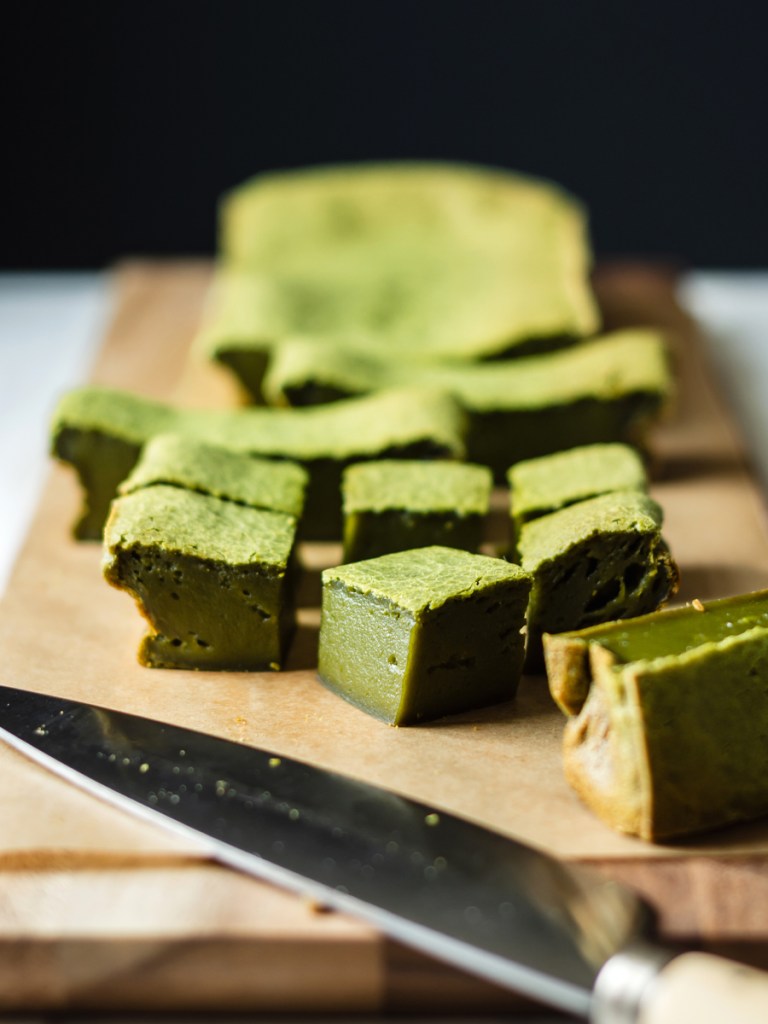
Let cakes cool for 15 – 20 minutes before removing from the loaf pans with a plastic pastry scraper. Then place the cakes on a cooling rack to continue to cool for another 20 minutes before cutting. The mochi loaves can be cut into any size and shape to your preference. I like to cut them into cubes.
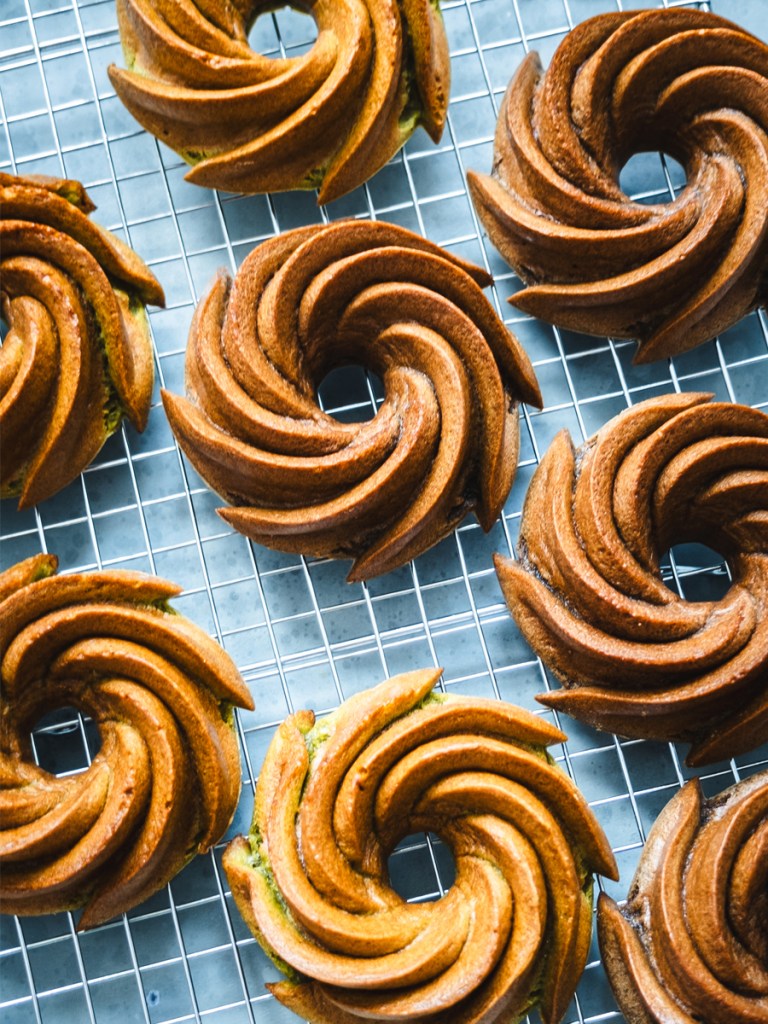
Mini Bundt Pans
Once the bundt cakes are out of the oven, set a timer for 5 minutes. Then cover pan with a wire cooling rack, put on oven mitts, and flip the pan over. If the bundt cakes didn’t release, wait an additional minute; use a toothpick to help loosen the edges and lift out the cake. See more Tips for Baking with a Bundt Pan from the the Pioneer Woman. Let bundt cakes continue to cool on the rack for another 5 minutes before serving.
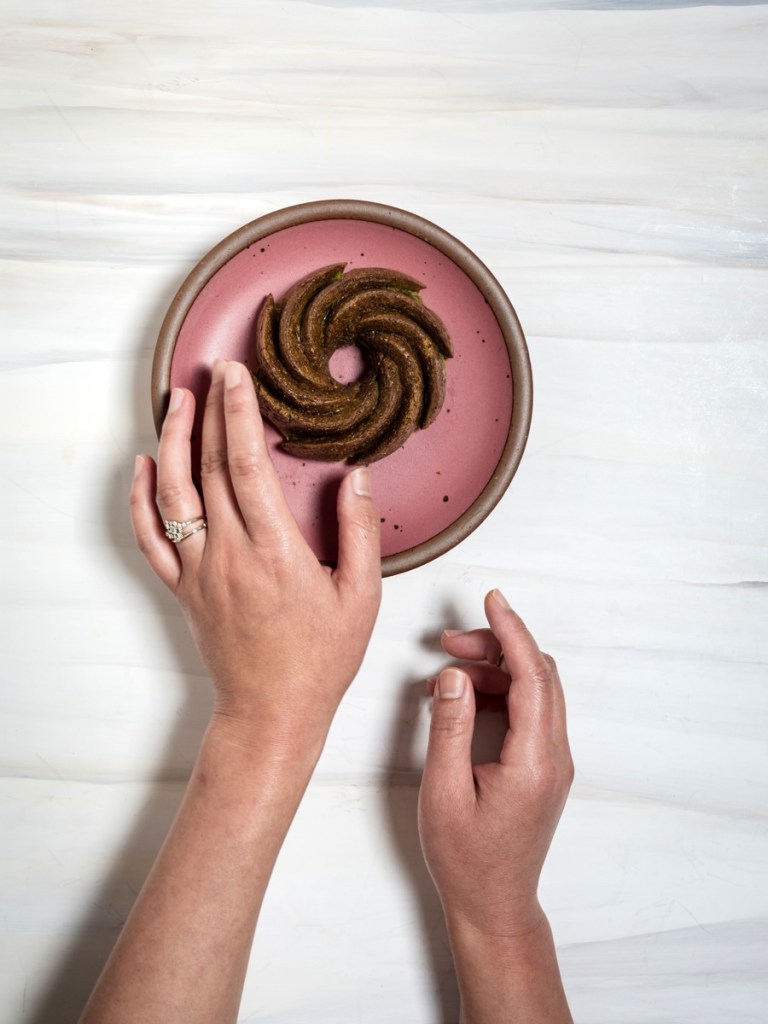
Mochi cake is best enjoyed warm and freshly baked—I love the combination of crunchy outside with fluffy and chewy inside. It’s difficult not to eat the whole batch in one sitting.
Storage
If you are not serving them immediately, let them cool completely for 1 – 2 hours, uncovered on a cooling rack. Store them in a loosely covered container for up to 2 days at room temperature. Sadly, the mochi cake exterior will lose the crunchy texture by the next day, regardless of storage method.
Store leftover mochi cake in the freezer. Once mochi cake is completely cooled, place them in a freezer bag or airtight container with parchment paper and food grade silica gel packets, for up to 14 days. When you’re ready to eat them, heat mochi cake in the microwave (on medium high) for 30 – 45 seconds; no need to defrost.
Do not store mochi cake in the fridge—it will dry out and harden quickly.
Yield
2 loaves or 12 mini bundt cakes at 3.5 in (8.89 cm) diameter
Notes
General
If the dry ingredients seem to be clumpy (especially with maple sugar) try sifting all the dry ingredients together; which is recommended if you’re using a hand mixer.
The cake will be fluffy when it’s fresh from the oven, but it will flatten quickly, like a soufflé. So get the camera ready if you would like to take photos.
If the cake hardens, you can help soften it by heating it in the microwave for about 8 – 10 seconds.
Optional Toppings
You can simply enjoy the mochi cake plain, which is my preference. Or you can experiment with these and other toppings


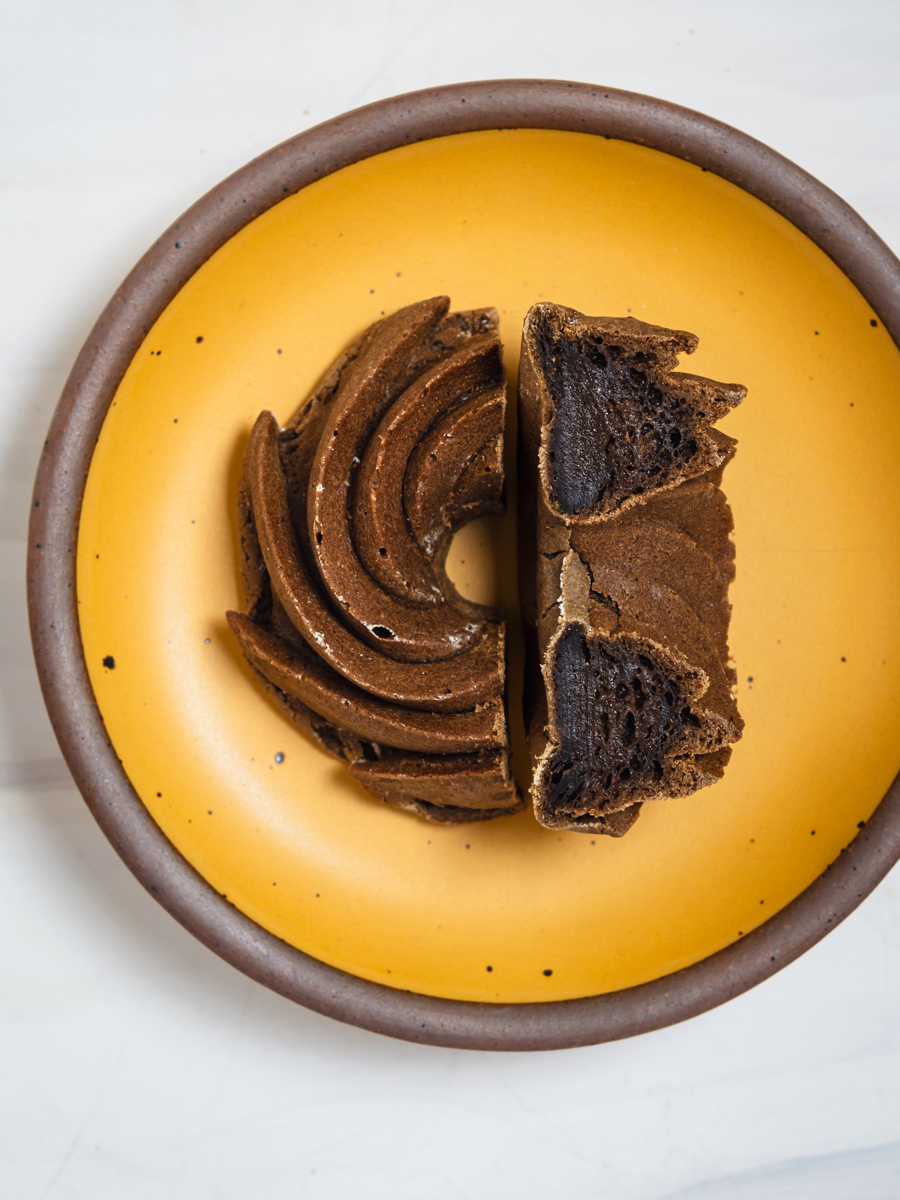
70% Dark Chocolate
Use 50 g (¼ cup) dark chocolate with 7 g (1.5 tsp) coconut oil.
Melt dark chocolate and coconut oil together in a heat-safe glass bowl, using a small saucepan, on low heat. See this YouTube tutorial on how-to melt chocolate using the double boiler method. Dip or drizzle the melted chocolate on mochi cake before serving.
Edible Gold Dust
Odorless and tasteless—purely for decoration and frivolously fun!
Ceremonial Grade Matcha
Use ceremonial grade matcha (sparingly), not culinary matcha because it’s far too bitter. For me, dusting with ceremonial matcha is an aesthetic choice for photos but not practical, and it doesn’t add any value in taste.
Substitutions
As an alternative, plain almond milk can also be used instead of oat milk or whole milk. I would not recommend using coconut milk because it has more saturated fat.
Instead of safflower oil, you can use canola, coconut oil, peanut or any vegetable oil.
Shortening can be replaced with soften (not melted) coconut oil, lard, margarine or vegan butter.
Don’t have any loaf pans, or mini bundt pans? You can use one standard 8 in (20 cm) round or square pan in any heat-safe material (i.e. glass or metal). Baking at 350°F (180°C), for 45 minutes initially, check the cake (with a toothpick), then add baking time in 5 minute increments until the cake is done. Make a note of the total baking time for the pan of your choice.
Variations
If you would like to make two different flavors in a single batch, you can make a plain batter first, then split the batter in half to add different flavor ingredients separately.
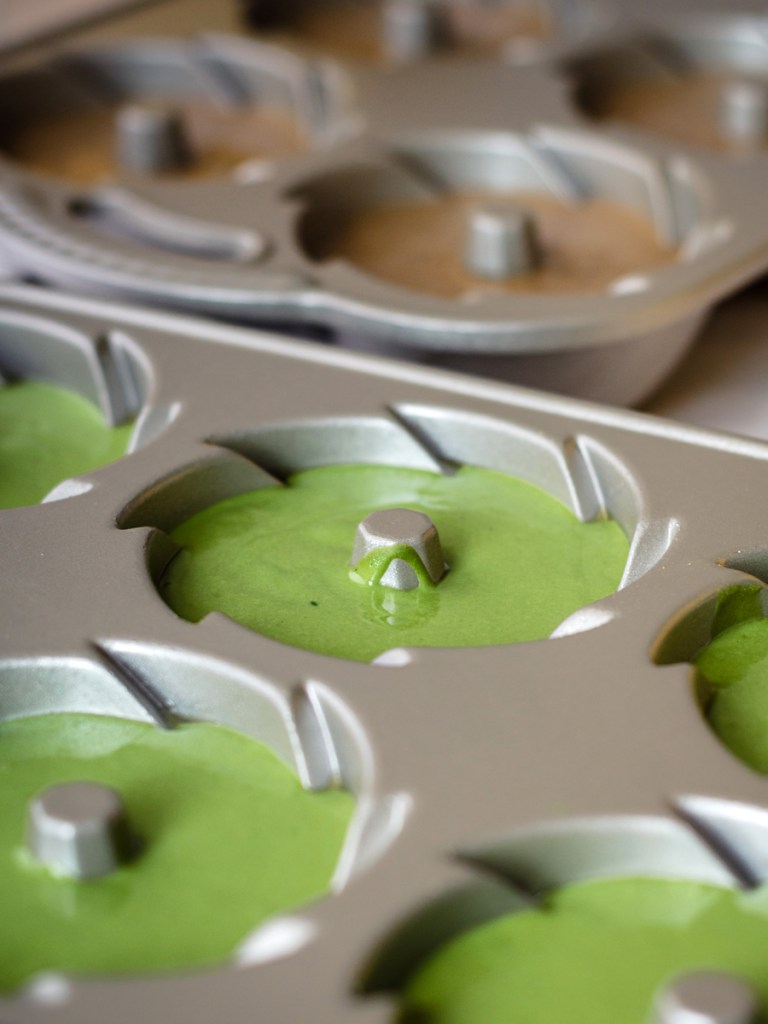

Set aside matcha and second flavor. Mix the rest of the ingredients together (glutinous rice flour, sugar, salt, vegetable oil, milk and eggs); scrape the bowl and mix he plain batter for ~ 6 minutes. Pour half (665 g) of the plain batter into a separate mixing bowl, and add the following:
| Flavor | Half Batch | Full Batch |
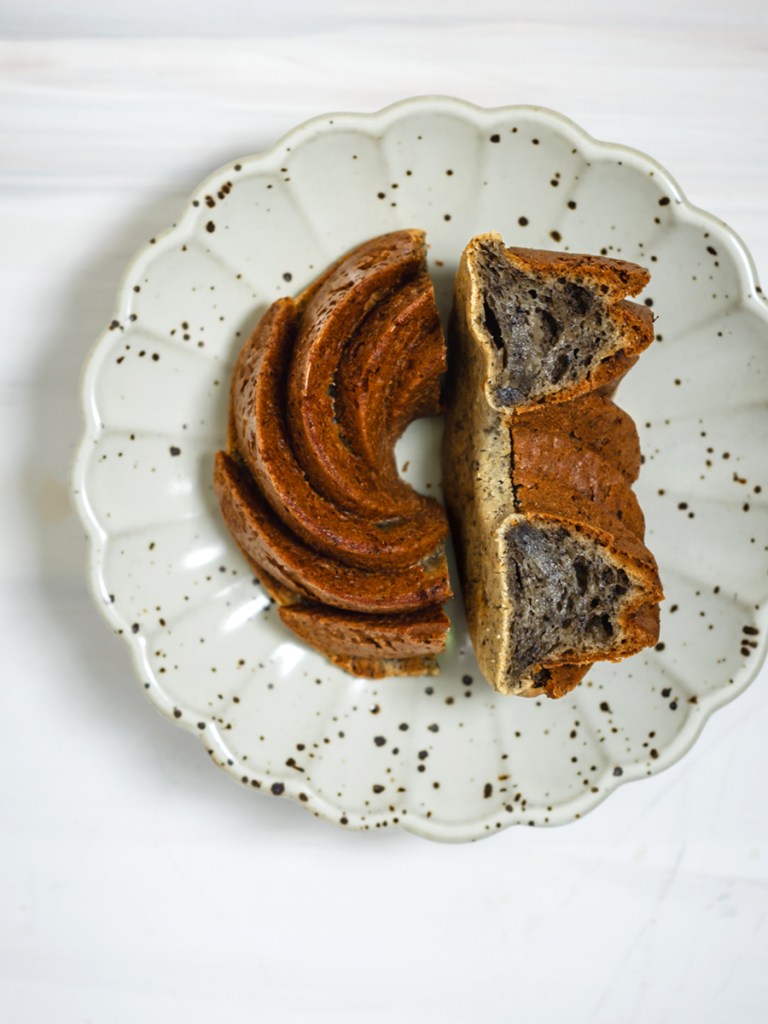
| Black Sesame Powder | 20 g | 40 g |
| Hojicha Powder, Sifted | 12 g | 24 g |
| Culinary Matcha, Sifted | 10 g | 20 g |
Continue to mix and scrape the bowl for 6 more minutes, or until the flavored batter is smooth.
If you’re baking a split flavor batch, observe if the baking time is different for each ingredient. For example, I noticed when I baked a matcha and black sesame split (mini bundt cake) batch recently, that the matcha version finished baking a few minutes ahead of the black sesame. Make a note of the baking time for each flavor ingredient you use.
Resources
Here are the supplies I like to use for this recipe:
Ingredients
Culinary Matcha, either:
- Hekisuien Deluxe Chiyo no Sakae Matcha (sold by Sazen Tea)
- Kettl Tea Hukuju Matcha (100 g; also excellent for matcha lattes)
- Matchæologist Midori™ Culinary Matcha—use promo code: MOSTLYMATCHA during checkout for a 15% storewide discount for readers of my blog. No minimum, and no expiration date
Erawan Glutinous Rice Flour (also available at most Asian grocery stores)
Koda Farms Mochiko Sweet Rice Flour
Vigor & Health Black Sesame Powder—any brand from Taiwan will work; check the packaging to be sure it’s purely black sesame (no additives), or make it yourself
Kettl Tea Houjicha Powder (100 g; also good for lattes)
Equipment
Zenker Tin Plated Steel Loaf Pan or Nordic Ware Mini Heritage Bundt Cake Pans
Hamilton Beach Hand Mixer with Snap-On Case
KitchenAid 5-Speed Ultra Power Hand Mixer
OXO Good Grips Silicone Basting and Pastry Brush, Small
Rosle Fine Mesh .07 Quart Tea Strainer (for sifting matcha)
Williams Sonoma Melamine Mixing Bowls with Spout (a set of 3)
Story

This recipe was my first post I shared on this blog in July 2017. After tinkering with the original recipe (by Jennifer Che of Tiny Urban Kitchen) for a couple years to adjust the ingredients to my preference—less sugar, more matcha, and adding a pinch of sea salt. Jennifer also has a version of this recipe baked as adorable matcha mochi cupcakes if you’d like to give that a try.
I started experimenting with the Nordic Ware Mini Heritage Bundt Cake Pans in 2020, and it’s now my preferred way of baking this recipe. But as my husband points out—some people may be intimated by the bundt pans, and not everyone will enjoy the same things I like.
So, choose your own adventure—loaf pans, bundt pans, or something else? There’s no right answer. The result will be delightfully delicious crowd-pleasers.
Enjoy and matcha (mochi) cheers,
jz
This post contains affiliate links. If you buy something through my links, I may earn a commission at no cost to you. I only recommend products I like.
